Want to have a YouTube thumbnail that instantly makes your viewers click on it? Here we will guide you on the process of how to make YouTube thumbnails and make sure they work. So, let’s not waste any more of your time and get straight to it!
Here is what we cover in this guide:
How to Make a Thumbnail for YouTube
Step 1: Choose the Right Tools
Step 2: Select a Compelling Image
Step 3: Add Text Strategically
Step 4: Use Color Psychology
Step 5: Incorporate Branding Elements
Step 6: Use Faces and Emotions
Step 7: Create Contrast and Focus
Step 8: Experiment with Layouts
Step 9: Optimize for Different Platforms
Step 10: Leverage AI YouTube Thumbnail Generators
Step 11: A/B Test Your Thumbnails
Step 12: Stay Updated with Trends
YouTube Thumbnail Dimensions
YouTube Thumbnail Size
YouTube Thumbnail Aspect Ratio
YouTube Thumbnail Font
YouTube Thumbnail Ideas
How to Use Podcastle for YouTube Content
How to Make a Thumbnail for YouTube
Creating eye-catching YouTube thumbnails is a crucial skill for any content creator looking to boost their video performance. Let's dive into a step-by-step guide on how to make thumbnails for YouTube that will grab viewers' attention and increase your click-through rates.
Step 1: Choose the Right Tools
To learn how to create thumbnails for YouTube successfully, you’ll first need to find the right tools. While professional software like Adobe Photoshop can be great, there are also many beginner and user-friendly options available:
- Canva: A popular online design tool with pre-made templates.
- Renderforest: A beginner-friendly YouTube thumbnail maker full of great templates to start with.
- Snapseed: A powerful mobile app for on-the-go editing.
- Veed: an AI YouTube thumbnail generator for those who want a quick, automated option.
Pick a tool that matches your skill level and needs. Remember, the best tool is the one you're comfortable using consistently.
Step 2: Select a Compelling Image
The foundation of any great YouTube thumbnail is a strong, relevant image. This could be:
– A high-quality screenshot from your video
– A custom photo you've taken
– A stock image that relates to your content
Whatever you choose, make sure it's clear, eye-catching, and gives viewers a hint about what to expect from your video.
Step 3: Add Text Strategically
Most effective YouTube thumbnails include some text to provide context or create intrigue. When adding text, keep it short and punchy, use large, easy-to-read YouTube thumbnail fonts, make sure there is enough contrast between your text and the background, and consider using text that complements the visual elements.
Remember, your thumbnail will be small on most screens, so clarity is key.
Step 4: Use Color Psychology
It’s not a secret to anyone that colors evoke emotions and grab attention. Consider using:
– Bright, contrasting colors to stand out
– Warm colors (red, orange, yellow) to create urgency or excitement
– Cool colors (blue, green, purple) for a calm or professional feel
But of course, if you already have your brand colors, it’s better to stick to them for all your YouTube thumbnails so that your page visually looks consistent with your branding.
Step 5: Incorporate Branding Elements
Talking about branding: remember to stick to your brand overall throughout your YouTube thumbnail production process. If you can make it subtle, include your logo in the corner; if not use some of your branded elements in your thumbnail.
That said, make sure you don’t make it over-promotional, but at the same time, don’t make your visuals all over the place. Keep it simple and to the point. Sometimes all you need is a consistent graphic design style that can reinforce your brand while not looking too salesy to push your viewers away.
Step 6: Use Faces and Emotions
Human faces, especially those showing strong emotions, can significantly boost thumbnail performance. If it fits your content, consider including:
– A close-up of a face with an exaggerated expression
– A before-and-after comparison with clear emotional states
– Multiple faces reacting to something (great for reaction videos)
– A surprised or shocked face creates intrigue
– A smiling face for positive, uplifting content
– A thoughtful or confused expression for educational or problem-solving videos
The power of faces in thumbnails lies in their ability to create an emotional connection with potential viewers. We're naturally drawn to human faces and can quickly interpret emotions, making facial expressions a shortcut to conveying the mood or content of your video.
When using faces, ensure they're high-quality, well-lit images that are easily visible even at smaller sizes. Remember to respect privacy and copyright laws – use your own face, that of a willing participant, or properly licensed stock photos.
Step 7: Create Contrast and Focus
Your goal is to make your YouTube thumbnail pop out from the sea of other videos competing for attention. To achieve this, you need to guide the viewer's eye to the most important elements of your thumbnail.
One effective technique is using a shallow depth of field. This means keeping your main subject in sharp focus while blurring the background. This technique not only creates a professional look but also naturally draws the eye to the focal point of your image. You can achieve this effect in the production stage or replicate it in editing software.
Don't underestimate the power of negative space. This doesn't necessarily mean white space; it's simply areas of your thumbnail that are free from busy elements. By strategically employing negative space, you can make your key elements – be it text, faces, or products – stand out dramatically.
Step 8: Experiment with Layouts
The layout of your YouTube thumbnail can make or break its effectiveness. While there's no one-size-fits-all solution, certain layouts have proven successful across various niches. The key is to experiment and find what works best for your content and audience.
1) Split screen (before/after or comparison)
The split-screen layout is a classic for a reason. It's perfect for before-and-after comparisons, product reviews, or any content that involves contrasting ideas. You can divide your thumbnail vertically or horizontally, depending on your content. For instance, a weight loss video might show a 'before' image on the left and an 'after' image on the right.
2) Thirds layout (image on two-thirds, text on one-third)
The rule of thirds is a fundamental principle in photography and design that can elevate your thumbnails. Imagine your thumbnail divided into a 3x3 grid. Placing key elements along these lines or at their intersections creates a balanced, visually appealing composition. You might have your main image occupying two-thirds of the space, with text or additional visuals in the remaining third.
3) Central focus with supporting elements around the edges
Another popular option is the central focus layout. This involves placing your main subject or text in the center of the thumbnail, with supporting elements arranged around the edges. This layout works well for videos focused on a single person, product, or concept.
Don't be afraid to think outside the box. Some creators find success with asymmetrical layouts, diagonal compositions, or even intentionally chaotic designs that reflect the energy of their content.
The key is to make sure that regardless of your chosen layout, the most crucial information – be it a face, a product, or a text hook – is immediately noticeable.
Step 9: Optimize for Different Platforms
Remember that your YouTube thumbnail will appear in various sizes across platforms. Test how it looks:
– In YouTube search results
– As a suggested video
– On mobile devices
– Embedded on other websites
Make adjustments to your YouTube thumbnail dimensions if needed to guarantee clarity at all sizes.
Step 10: Leverage AI YouTube Thumbnail Generators
An AI YouTube thumbnail generator works by analyzing your video content and applying design principles to create multiple thumbnail options. They can save you hours of work, especially if you're publishing content frequently. Many of these tools use machine learning algorithms to understand what types of thumbnails perform well, incorporating this knowledge into their designs.
Step 11: A/B Test Your Thumbnails
Creating great YouTube thumbnails is often a process of trial and error. Use YouTube's A/B testing feature to upload multiple thumbnail options, let them run for a set period of time, and analyze which performs better in terms of click-through rate.
Use these insights to refine your thumbnail design strategy over time.
Step 12: Stay Updated with Trends
YouTube trends come and go, and this includes thumbnail styles. Stay current by:
– Regularly checking top-performing videos in your niche
– Following YouTube creator blogs and forums
– Experimenting with new styles and techniques
Remember, while it's good to be aware of trends, don't compromise your unique style and branding.
YouTube Thumbnail Dimensions
Understanding the correct dimensions for your YouTube thumbnails is crucial for creating visually appealing and effective thumbnails. Let's break down the key aspects of YouTube thumbnail dimensions to ensure your thumbnails look great across all devices and platforms.
1) YouTube Thumbnail Size
What size are YouTube thumbnails? The recommended size for YouTube thumbnails is 1280 x 720 pixels. This size guarantees that your thumbnail looks crisp and clear on all devices, from smartphones to large desktop monitors. YouTube requires a minimum width of 640 pixels for thumbnails, but using the recommended YouTube thumbnail resolution will give you the best results.
2) YouTube Thumbnail Aspect Ratio
The aspect ratio for YouTube thumbnails is crucial for proper display. Here are the key points:
- YouTube thumbnails should have a 16:9 aspect ratio
- This widescreen format matches the dimensions of most YouTube video players
- Maintaining this YouTube thumbnail aspect ratio prevents your thumbnail from being cropped or distorted
Keep in mind though, that for the YouTube shorts thumbnail, the aspect ratio is a bit different, more precisely 1920 by 1080
3) YouTube Thumbnail Font
Choosing the right font for your YouTube thumbnail can significantly impact its effectiveness. Here's how to choose the perfect one:
- Be bold: Opt for bold, easy-to-read fonts that are legible even at small sizes
- Go for sans-serif options: Consider using sans-serif fonts for better readability on digital screens
- Keep your branding in mind: Ensure your font choice aligns with your brand identity and video content
- Keep it simple: Limit yourself to one or two fonts per thumbnail to maintain a clean, professional look
YouTube Thumbnail Ideas
Now that you know how to make YouTube thumbnails, here are some great YouTube thumbnail examples to help you get inspired:
1) Bold Text with a Catchy Phrase
Here’s an example: a YouTube thumbnail that simply says, "5 Hacks You Need to Know!" in big, bold letters. The text takes up most of the space, making it super easy to read, even on a small screen. Pair it with a simple background image that relates to the hacks you're sharing. This style is straightforward but really effective at grabbing attention.

2) Big, Bright Elements
Use a thumbnail with a giant shocked emoji next to your face, both reacting to something crazy happening in the video. The use of big, bright emojis adds a fun and playful element to your thumbnail, making it stand out in a pile of more serious or bland images.
Overall, consider using bright elements in your YouTube thumbnail, even if you’re not a big fan of emojis.

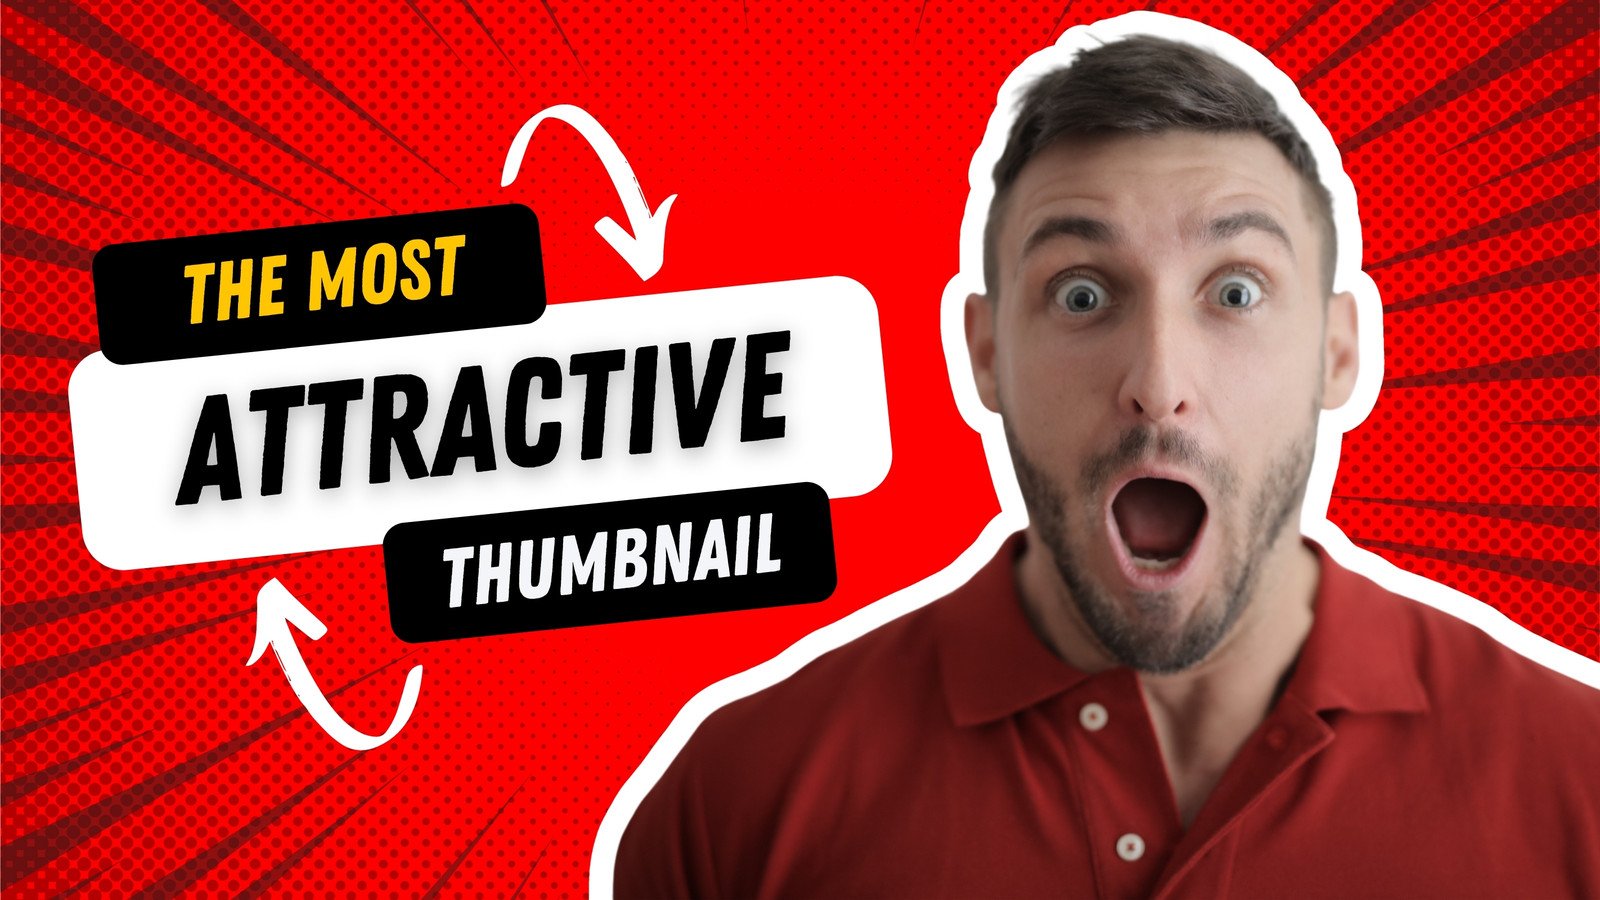
3) Close-Up of a Face
A close-up of your face with an exaggerated expression—like surprise or excitement—can work wonders as a thumbnail. Faces are naturally engaging because people are drawn to other people.
Whether you’re reacting to something or explaining a topic, a close-up thumbnail with strong emotions can make viewers curious to know what’s going on.
How to Use Podcastle for YouTube Content Creation
Making the best YouTube thumbnails is a process in itself. Why not make things easier? If you're shaping video content for YouTube, make sure to give our AI-powered tools a shot. You can bring your audio to studio-quality, and upscale your video quality, without the need for high-grade equipment. And the best part? You can automatically generate captions, subtitles, and transcripts of your content.
We hope these YouTube thumbnails will prevent an artist’s block and help you get started quicker. With all these rules in mind, also remember that it’s not a must to follow them all. If something feels right, go ahead and do it. You’ll figure out eventually which aesthetic works best for you. So keep experimenting, and when you see that a specific design gets a lot of clicks, stick with it.