Ever spent hours tweaking fonts, aligning images, and perfecting transitions in your presentation? We get it. You're not alone in obsessing over those little details that make your slides pop. But here's a secret weapon many presenters overlook: audio.
Adding music to your Google Slides isn't just about making things more entertaining (though it definitely does that). It's about creating an atmosphere, emphasizing key points, and making your message stick long after the last slide. Think of it as the soundtrack to your ideas – setting the perfect mood and keeping your audience hooked.
The best part? Google Slides makes adding audio a breeze.
In this guide, we'll walk you through the why and how of spicing up your presentations with sound.
Table of Contents
- How to Prepare Audio Files for Google Slides
- How to Add Audio to Google Slides
- Adding Audio to Google Slides Using a URL
- How to Record Audio For Google Slides
- Why Should You Add Audio to Google Slides?
How to Prepare Audio Files for Google Slides
Before you go wild adding sounds to every slide, let's talk about getting your audio files ready.
If you're uploading audio files, Google Slides works best with MP3 or WAV formats. These are widely compatible and maintain good sound quality. And the shorter these sound files are, whether it's music, narration, or sound effects, the better it is. Long audio files can overwhelm slides and lose the audience's attention.
One last thing: keep an eye on file size. Google Slides has a 100MB limit for audio files. Larger files may need compression, but it's important to balance size reduction with maintaining clear, crisp audio quality.
How to Add Audio to Google Slides
Now that you know how to produce high-quality audio for your presentation, it's time to learn how to add an audio recording to Google Slides. Once you master this simple process, you are all set to rock all your presentations.
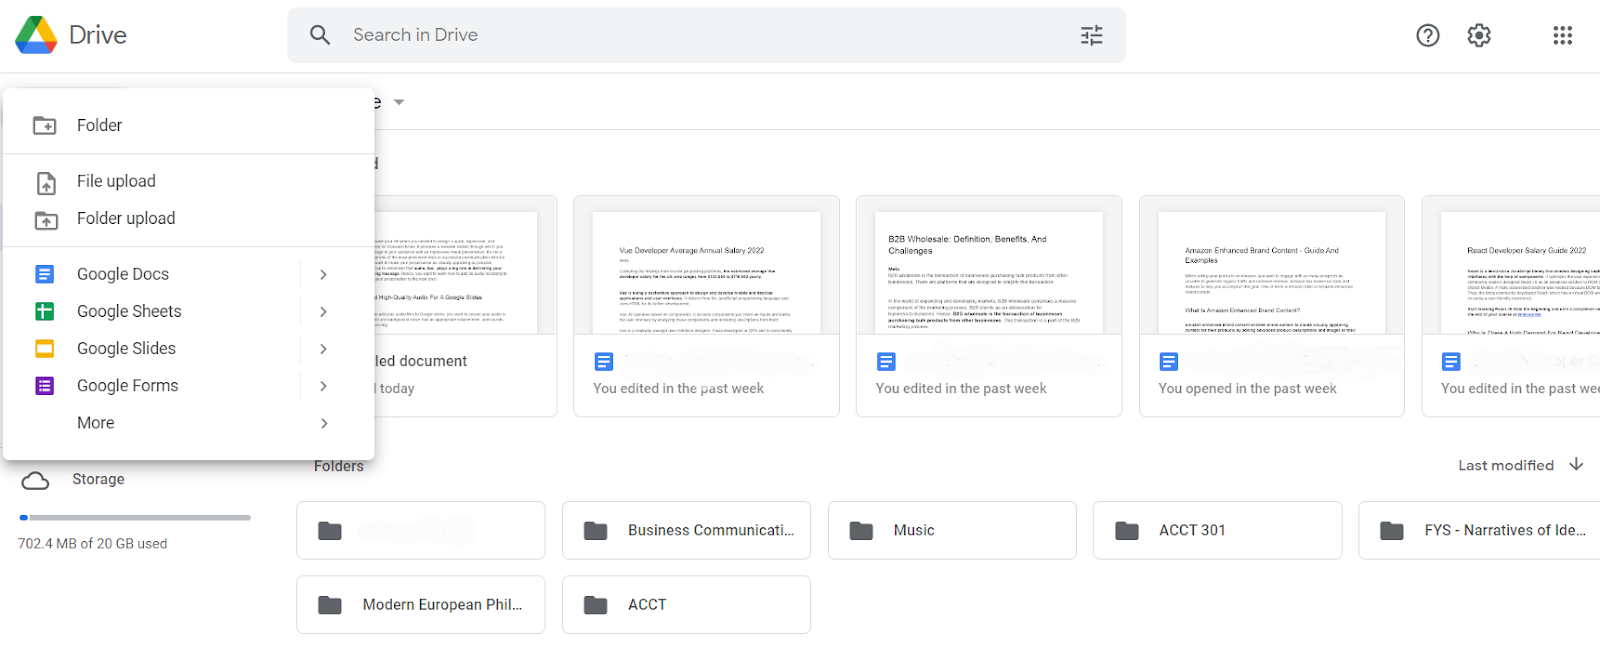
1) Upload your audio to Google Drive
Google Drive is the cloud storage where all of your files and folders related to different Google platforms are saved. Hence, to add a new file to Google Slides, you would first need to upload the file into Google Drive.
Click on the New button on the top left of your Google Drive account page. Then, select the File Upload button and upload your audio from your device to Google Drive.
Note: if you are planning to share your Google Slides template presentation with others and want them to access your audio, make sure to give them access to your audio file separately from Google Drive. You can do this on your file settings.
2) Insert your audio into Google Slides
On your Google Slides window, tap on the Insert button amongst the top menu options and select the Audio option.
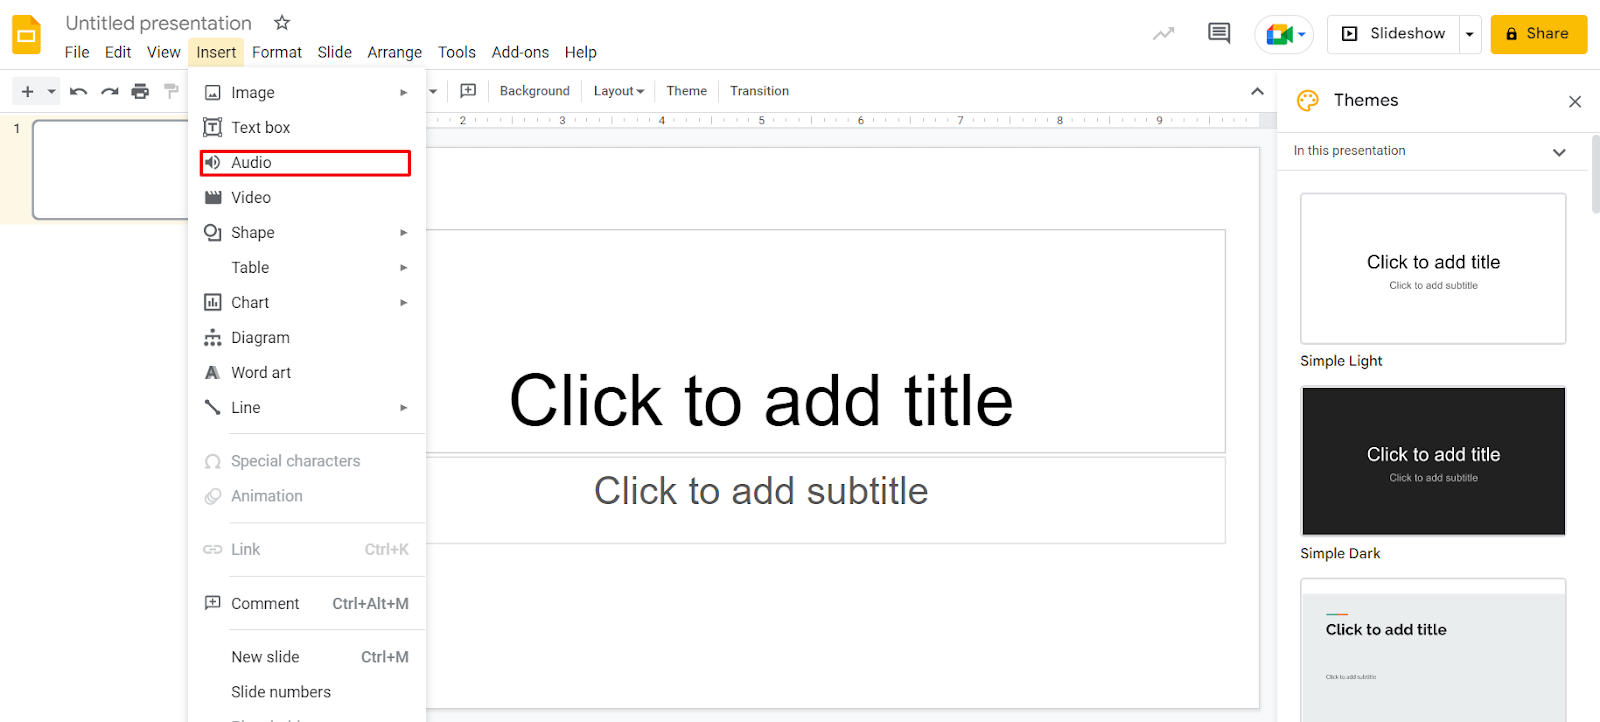
Next, choose the audio you have already uploaded to your Google Drive. After your audio is on your slide, adjust the audio icon to make it look more synchronized with your presentation.
3) Format your audio
Google Slides enables basic formatting for your audio. Namely, you can control the reflection, shadow, volume, and other essential elements of your audio file by clicking on the audio icon and adjusting the menu options displayed on the right part of your screen.
Adding Audio to Google Slides Using a URL
Google Slides allows you to insert audio from Google Drive, but it doesn't directly support adding audio from external URLs. However, you can add a link to an audio file hosted online.
When you add a URL link to your slide, it creates a clickable element. During the presentation, clicking this link will typically open the audio source in a new browser tab or window. This method doesn't embed the audio directly into your slide, but it does provide a way to access external audio content.
Keep in mind that this approach requires an internet connection during your presentation. It's best suited for situations where you occasionally need to reference external audio content, rather than for continuous background music. As with any external media, make sure you have the rights to use the audio in your presentation.
Here's how it works:
Step 1) Find Your Audio

First, locate the audio you want to use on a platform that allows direct linking, such as SoundCloud or a royalty-free music site. Make sure you have the rights to use the audio in your presentation.
Step 2) Copy the Audio URL

Once you've found your audio, copy its direct URL. On SoundCloud, for example, you can right-click on a track and select "Copy link."
Step 3) Insert the URL in Google Slides
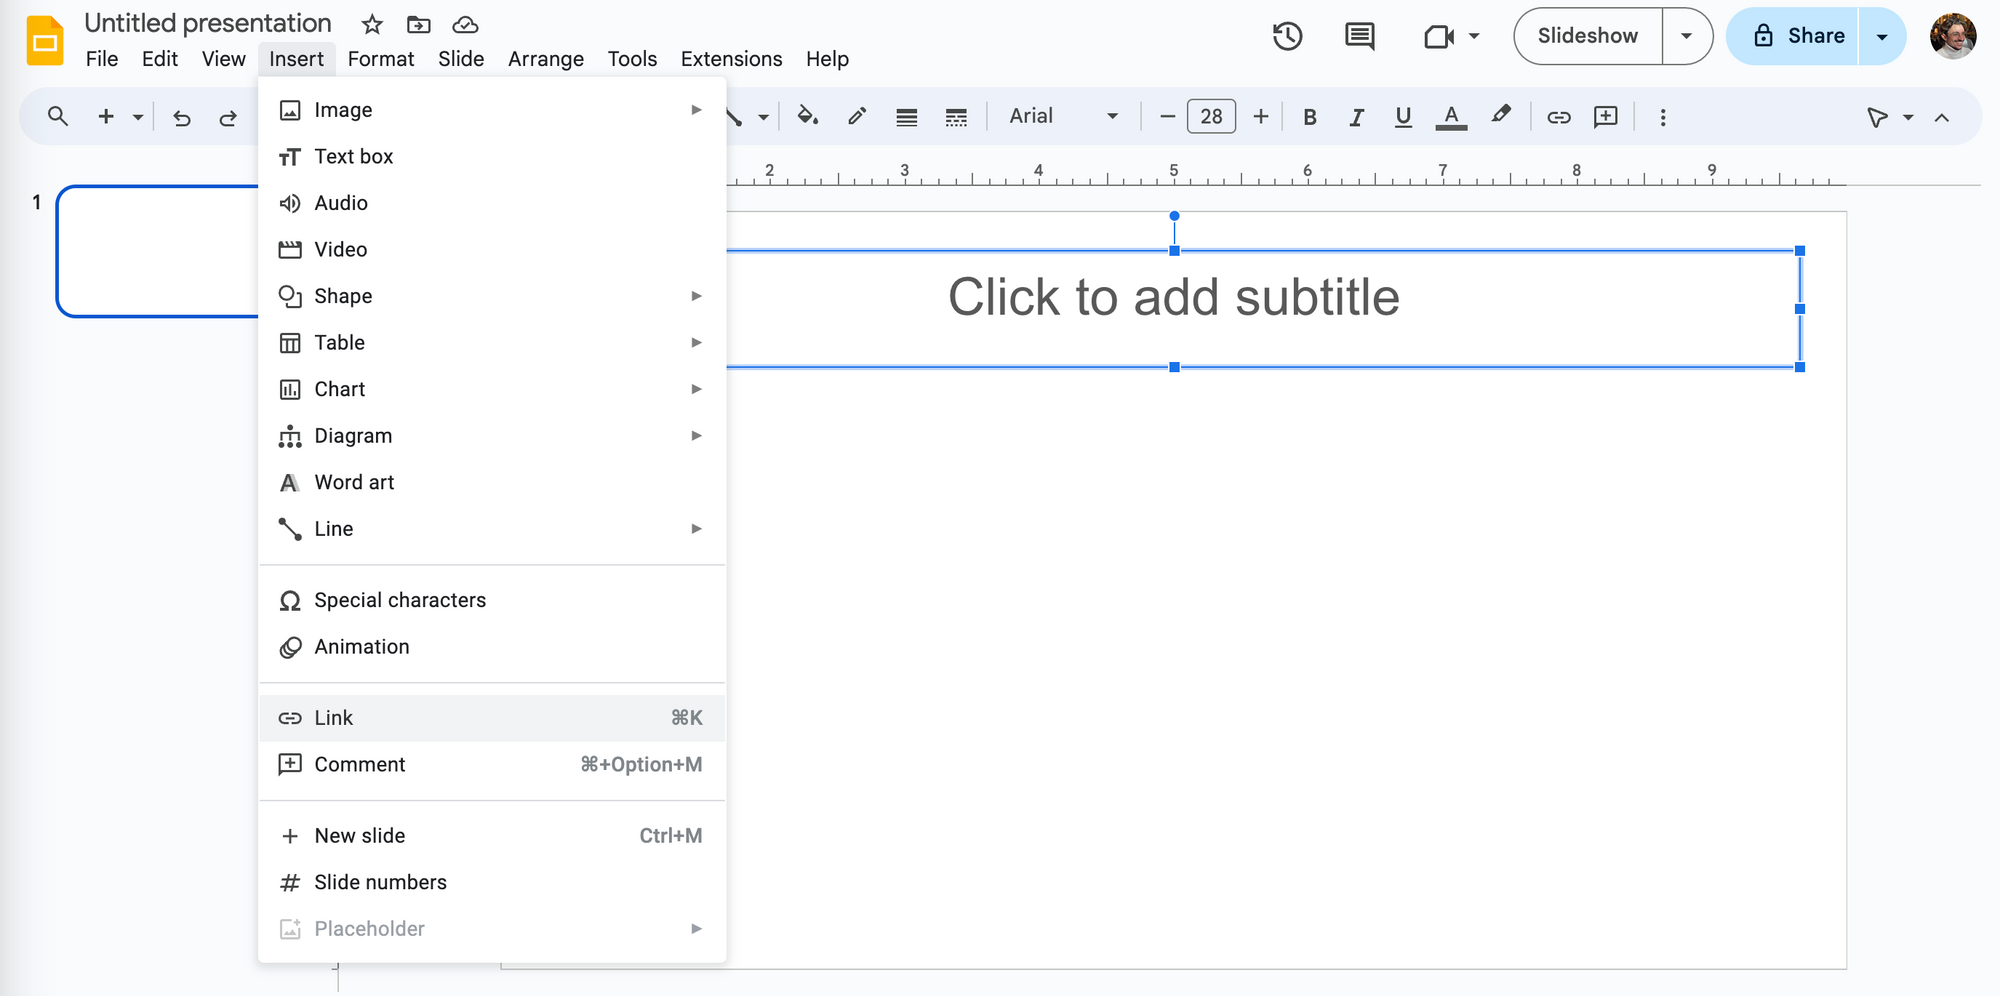
Open your Google Slides presentation and select the slide where you want the audio. Click "Insert" in the top menu, then choose "Link."
Step 4) Paste the URL
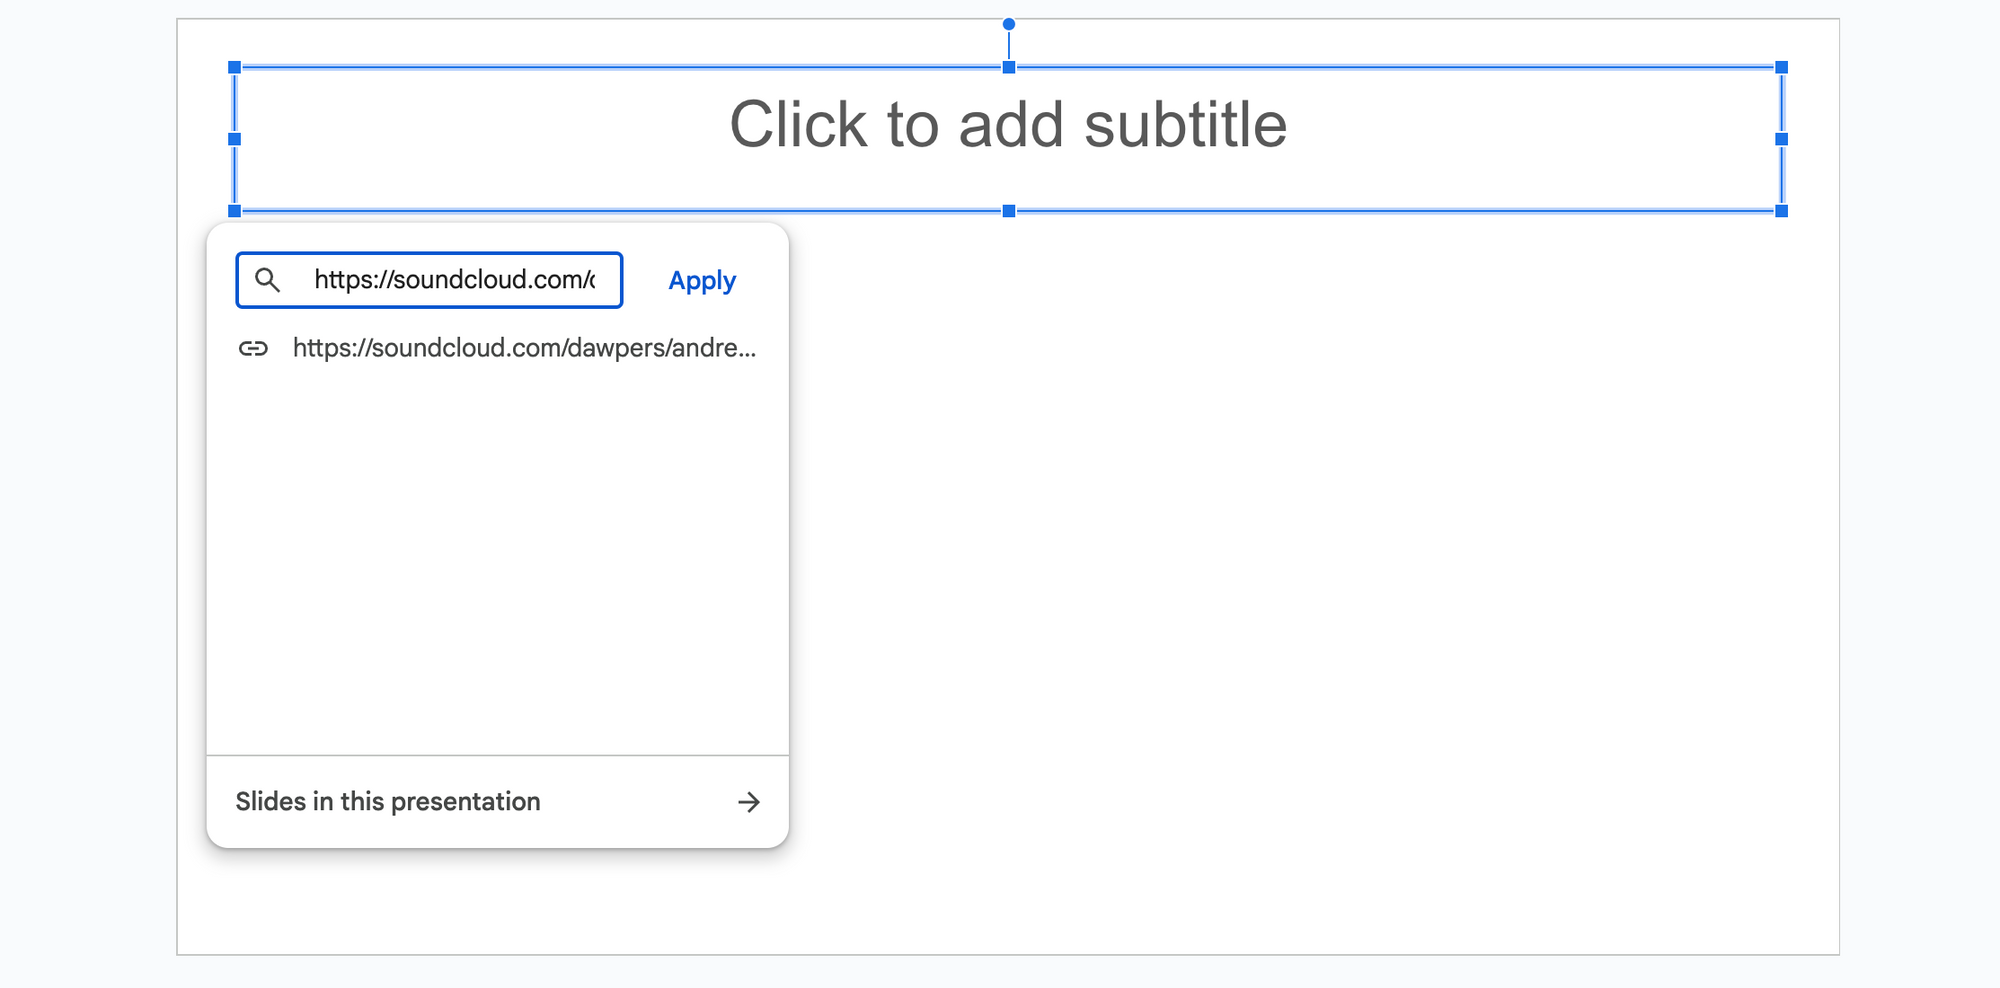
In the "Link" dialog box, paste your copied URL and click "Apply."
Step 5) Create a Trigger for the Audio
The link itself won't play audio automatically. Create a text box or shape on your slide, then apply the link to this object. You might label it "Play Music" or use a speaker icon.
Step 6) Test Your Audio
Enter presentation mode and click on your linked object. This should open the audio in a new tab, where it will start playing automatically.
How to Record Audio For Google Slides
Before learning how to add your audio files to Google Slides, you want to ensure your audio is clean, does not contain any background noise, has an appropriate volume level, and sounds professional and convincing.
To enjoy an exciting audio experience, you want to choose reliable audio recording software. Podcastle has two tools designed to help you create quality audio. You can use the audio recorder, which enables recording anytime through your laptop or phone. After recording the audio, you can edit it directly on your Podcastle account and export it as an MP3 or WAV file.
The other recording tool, Podcastle’s voice recorder, is designed to record professional voiceovers. Once you finish recording, you can remove any background noise with the Magic Dust feature. Podcastle’s voice recorder automatically creates separate tracks for each voice in a recording. Thus, if someone accidentally interrupts your recording, you don't have to start over again; you can remove the separate tack for the extra voice.
Ultimately, whichever tool you choose to produce your audio, you can transcribe your audio file into text with Podcastle’s audio transcription tool and add subtitles to your videos. As a result, your material will be more SEO-friendly and have a better chance to rank organically on search engines.
Why Should You Add Audio to Google Slides?
Now that you have mastered the technical part, let’s discuss the benefits of adding audio to your presentation.
1) Easier to Understand
Throughout a presentation, your audience has to keep track of whatever you are presenting verbally and the text you have included in your presentation. This requires a lot of concentration. Adding audio to your presentation invites your audience’s full attention to your message.
Also, remember that listening requires less effort than reading. You absorb whatever you listen to more rapidly than whatever you read. Therefore, adding audio to your presentation will eliminate some of the effort your audience must put into understanding your material.
2) Unique Tone
You may be an outstanding speaker who is incredibly good at presenting. However, let’s admit that all the presentations we hear become monotonous at a certain point. No matter which moment that point is, you want to overcome it by spicing up your presentation with something original and unique. Audio is that thing
Audio alleviates the anxiety and stress you have when presenting in person. If you add a voiceover to your presentation, it will sound different and create a more creative vibe. Even if you are doing the voiceover yourself, your audience will grab it differently, as it will sound more precise, well-filtered, adjusted, noiseless, and, most importantly, more confident.
3) Engaging Vibe
Choosing the right background music or sound can often complement your presentation by giving it a more engaging vibe and highlighting its mood. For example, if you are presenting about Christmas season discount strategies, you may want to include some Christmas music to make your audience feel the holiday vibe and stay engaged.
Troubleshooting Audio Issues
Say you've added your perfectly prepared audio, but something's not quite right. What then?
If your audio won't play at all, first double check you're using the recommended MP3 or WAV files. If the audio file still won't play, it's worth checking the file format and internet connection – Google Slides relies on a stable connection to function properly.
Volume problems, or the sound cutting off between slides, are also a common problem. If this is the case, adjusting the settings to allow audio to play across slides, and checking both the Google Slides audio settings and the device's volume controls, usually resolves these sound issues.
But for those who find the audio icon distracting, Google Slides offers an option to hide it during the presentation. This small change can significantly improve the visual appeal of slides.
Conclusion
Adding audio to Google Slides presentation is a simple 3-step process: uploading your audio to Google Drive, inserting it to Google Slides, and adjusting it. The more challenging part is recording high-quality audio and getting a professional sound. You can use Podcastle’s audio or voice recording tools for this.
Do not forget that adding audio to your presentation can help make your material more understandable, giving your presentation a unique tone and an engaging vibe.


