Once you’re done recording your podcast episode, you’re thinking about post-producing your audio (well, you should). As such, you wish you could make it sound as smooth and natural to the listener as if you were sitting right next to them. You know well that you can’t let your podcast sound artificial or unnatural; it should not be evident that you’ve changed anything. To achieve the excellent podcast sound that you’ve imagined in your mind, you need to utilize processing tools available to you, and one of those is the compressor. If you’re planning to do it yourself, it’s vital to understand what compression is, why you need it, how to use it, and what are the best podcast compressor settings. Don’t panic; we’re breaking it all down!
What Is Compression
The word compression is relatively self-explanatory: it compresses the audio file into a smaller dynamic range. Not to be confused with compressors used to reduce file sizes, audio compressors are used to reduce the loudest and quietest parts in your recording. When compressing your podcast, you want your listeners to hear everything from soft whispers to several people laughing simultaneously. For the best listening experience, your audience shall never consider adjusting the volume of your podcast for reasons or errors on your end. By integrating compression in your audio post-processing workflow and doing so masterfully, you will receive your audience’s sub-conscious appreciation.
Why Do You Need Podcast Compression
If you’re serious about your podcasting journey, compression is essential. With compression, your audio tracks will sound more studio-like, and thus, your audience will grow too.
You might be thinking, “If I need to reduce the dynamic range anyway, why do I need a compressor?” The answer is simple – you don’t want to compress the audio too much because it might sound bad, and you don’t want to compress it too little because it wouldn’t have any significant effect. That’s where the compressor comes into play; it gives you more control over the amount of compression you want to achieve.
Unavoidably, you will have interviewees who are not very considerate when speaking into a microphone. Sometimes, your guests may get too close to the recording gear or sit back too far from it resulting in the microphone not catching their voice the way you’d wish. Such cases usually cause distortion or clipping, as you’ll notice in your audio waveforms. The goal of compression is to minimize drastic ups and downs to achieve a smooth and pleasant sound.
How to Use Compression for Podcasts
Let’s dig into technicalities. Compressors are plugins that you can add to whatever audio editing software you’re using. With slight differences in the UI, compressors usually look something like this (ProTools’ stock compressor):
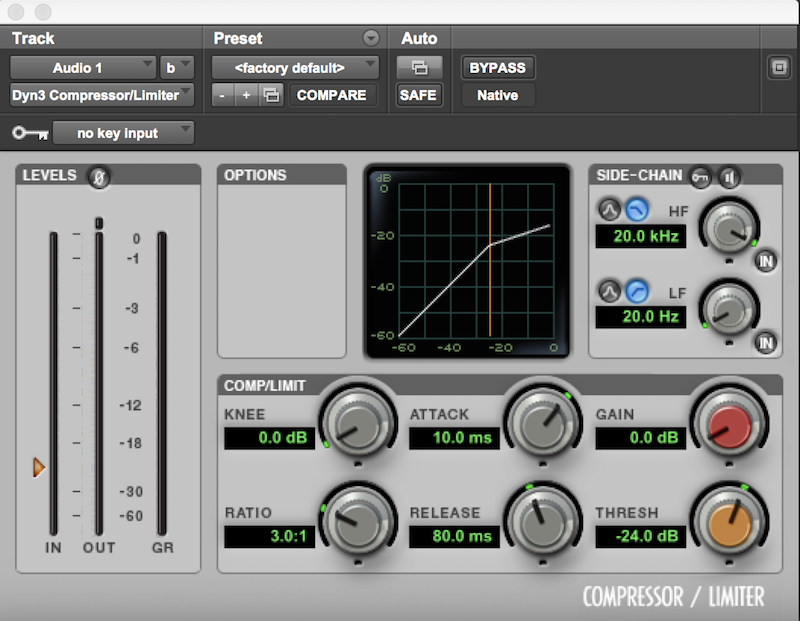
Compressors have three essential parameters that you need to adjust: threshold, ratio, and makeup gain.
Threshold
The threshold is the point at which compression will start to occur. The dB level you set as a threshold will be when your signal gets compressed. To make it even simpler, if your threshold is set to -20 dB, any sound that goes over -20 dB will get compressed. Usually, you would like to start from -16 dB to -10 dB if your sound is too loud.
Ratio
The ratio parameter will tell the compressor how much to compress the signal above the threshold. It determines the amount of compression, and it’s always displayed as a ratio (who would’ve thought). For example, if the ratio is 4:1, that means for every 4 dB the signal goes over the threshold, only 1 dB will be let through. You can start experimenting with 3:1 and 5:1 ratios and determine what works best for you.
Makeup gain
This parameter will make up for the volume loss caused by compression. It basically amplifies the signal after it’s been compressed. Without makeup gain (or automatic gain compensation), your signal would be quieter than before compression. Think of it this way: if you have your threshold set to -20 dB and you’re using a 4:1 ratio, that means that for every 4 dB above -20 dB, only 1 dB will be let through. To make up for the 3 dB of attenuation, you’ll need to add 3 dB of makeup gain.
Things You Should Avoid
The beauty of compression is that you can use it in many different ways to achieve the sound you’re looking for. The most common mistake people make is compressing audio too much, which results in an unpleasant “pumping” sound.
Another mistake is not using makeup gain. Remember, when you compress your sound, you’re attenuating it, which will result in a quieter sound. You need to make up for that lost volume by turning up the makeup gain. If you don’t, your signal will sound noticeably softer and lose impact.
Finally, don’t overdo it with the threshold. If you set the threshold too low, you’ll end up compressing everything, which can result in a “muddy” sound. For better results, start with a higher threshold and only lower it if you feel like you need to.
Conclusion
Podcast compression is all about evening out your audio levels so that everything can be heard clearly, without any peaks or valleys, and compression is a powerful tool that every podcaster should use to achieve a professional sound. Experiment with parameters, and you’ll eventually get the hang of it in no time through a tad bit of trial and error.


