You hit “Post,” and then you saw it. The typo in the caption. The clip you forgot to trim. The moment that landed just a little too late. At that point, most creators face the same question: can I fix this without starting from scratch?
TikTok doesn’t make it easy, but there are a few things you can still change, and a few smart workarounds for the stuff you can’t.
This guide breaks it all down, so you know exactly what’s possible after your video goes live, and what to do next if something’s off.
What You Can and Can’t Edit After Posting on TikTok
So, you hit “Post” on your TikTok, and then you noticed the typo in your caption. Or maybe your lighting looks off, or you forgot to trim that awkward pause at the start. We’ve all been there. But before you panic-delete your hard-earned views, let’s talk about how to edit a TikTok video after posting, and more importantly, what’s actually possible.
First, the Bad News: What You Can’t Edit After Posting
TikTok doesn’t let you directly replace or modify your video once it’s live. That includes:
- The video file itself (no trimming, cropping, or replacing clips)
- Music or sound added in the app
- Stickers, effects, filters
- Text added on-screen
- Captions (yes, even a tiny spelling mistake)
In short: once it’s up, it’s locked. TikTok doesn’t currently offer a full re-edit feature like YouTube Studio might. So if you need to make a major change to the actual video content, you’ll have to delete and re-upload it.
Frustrating? Yes. But all is not lost.
What You Can Edit After Posting
Now for the good news: there are still a few things you can tweak once your TikTok is live:
1. Privacy Settings
You can change who sees your video.
- Tap the three dots (or the share icon) on your video
- Tap “Privacy settings”
- Change it from Public to Friends or Private
This is a handy move if you’re planning to do a quick re-upload and don’t want to lose your original clip.
2. Comments and Duets
You can adjust interaction settings:
- Disable or enable comments
- Allow or prevent duets and stitches
This can be useful if you want to control engagement after the video goes live without nuking the entire post.
3. Video Description and Hashtags
This is the one small win that saves a lot of creators: you can update your video’s description if you’ve saved the post as a draft before publishing. But once it's posted publicly, that edit option disappears. So, if you've already shared your TikTok and realize your caption has a typo or you forgot to include a trending hashtag, your only real choice is to repost.
If the description is crucial, say you're linking to another video, tagging a brand, or jumping on a trend, it might be worth pulling the video, correcting the caption, and uploading again. But be aware: reposting means starting from zero. Your views, likes, and comments don’t carry over. And in TikTok’s world, even a few minutes of difference in timing can affect how well your video performs.
So… What Can You Do if You're Unhappy with a Posted Video?
Because TikTok doesn’t support full in-platform editing after publishing, creators have come up with a few clever (and some not-so-clever) workarounds. Let’s walk through the options, with their pros and cons clearly spelled out.
1. Save and Repost the Video
This is the most common fix. If you've spotted an issue after posting, you can:
- Make your original video private or delete it.
- Save the video to your device.
- Re-edit the footage using an external tool.
- Re-upload it with a new caption, effects, or timing.
This works well when you’re trying to fix something small, like cutting out an awkward moment or replacing background music. But remember, if your video already had momentum (views, comments, shares), all of that resets. That can be a major downside if you're chasing reach.
Pro tip: If you’re planning to repost, save the original video without the TikTok watermark. Watermarks can make re-uploaded videos look recycled, which the algorithm doesn't love. Tools like Podcastle or third-party apps can help you manage and clean up your footage before reposting.
2. Use TikTok’s "Repost" Feature Creatively
You can’t edit a posted video, but you can stitch or duet it. Some creators lean into this by posting an updated or corrected version as a follow-up, either by stitching their own video or reposting it with new context.
Think of it like issuing a "Part 2" with the correction or commentary embedded. It's not elegant, but it can be funny, self-aware, and still keep the original video alive. Plus, this approach keeps your original views intact while updating your audience.
What TikTok Could Do (But Doesn't... Yet)
Let’s be real: TikTok’s editing limits aren’t ideal. Other platforms (like Instagram Reels and YouTube Shorts) have slowly added more post-publish editing features, and TikTok may eventually catch up.
But for now, what you see is what you get. That’s why editing TikTok videos before posting is so important. The fewer mistakes you make at the draft stage, the less likely you’ll need to mess with workarounds after.
Pro Tips to Avoid Post-Posting Regret
Since figuring out how to edit a TikTok video after posting isn’t as simple as clicking “Edit,” your best bet is to get it right before hitting publish. Here's how:
- Preview your video at least twice. Once for visuals, once with sound.
- Double-check your caption and hashtags. Misspelling a trending hashtag is a missed opportunity.
- Save a clean copy of your final draft before posting. This makes it easier to re-edit later if needed.
- Use a third-party editing app like Podcastle to polish your video beforehand. TikTok’s built-in editor is great, but limited when it comes to advanced cuts, transitions, or audio enhancement.
How to Edit TikTok Videos with Podcastle
So you’ve got your TikTok video ready but it’s missing that final layer of polish. Maybe the lighting is a bit off, the audio could be sharper, or you want to add a quick cut or smooth transition. This is where Podcastle comes in—not just for podcasts, but for creators who want to elevate their short-form video game too.
Whether you're fixing last-minute details or building a high-quality TikTok from scratch, Podcastle’s video editor gives you the flexibility and power to do it all. Let’s walk through exactly how to use it, step by step.
Step 1: Upload Your Footage
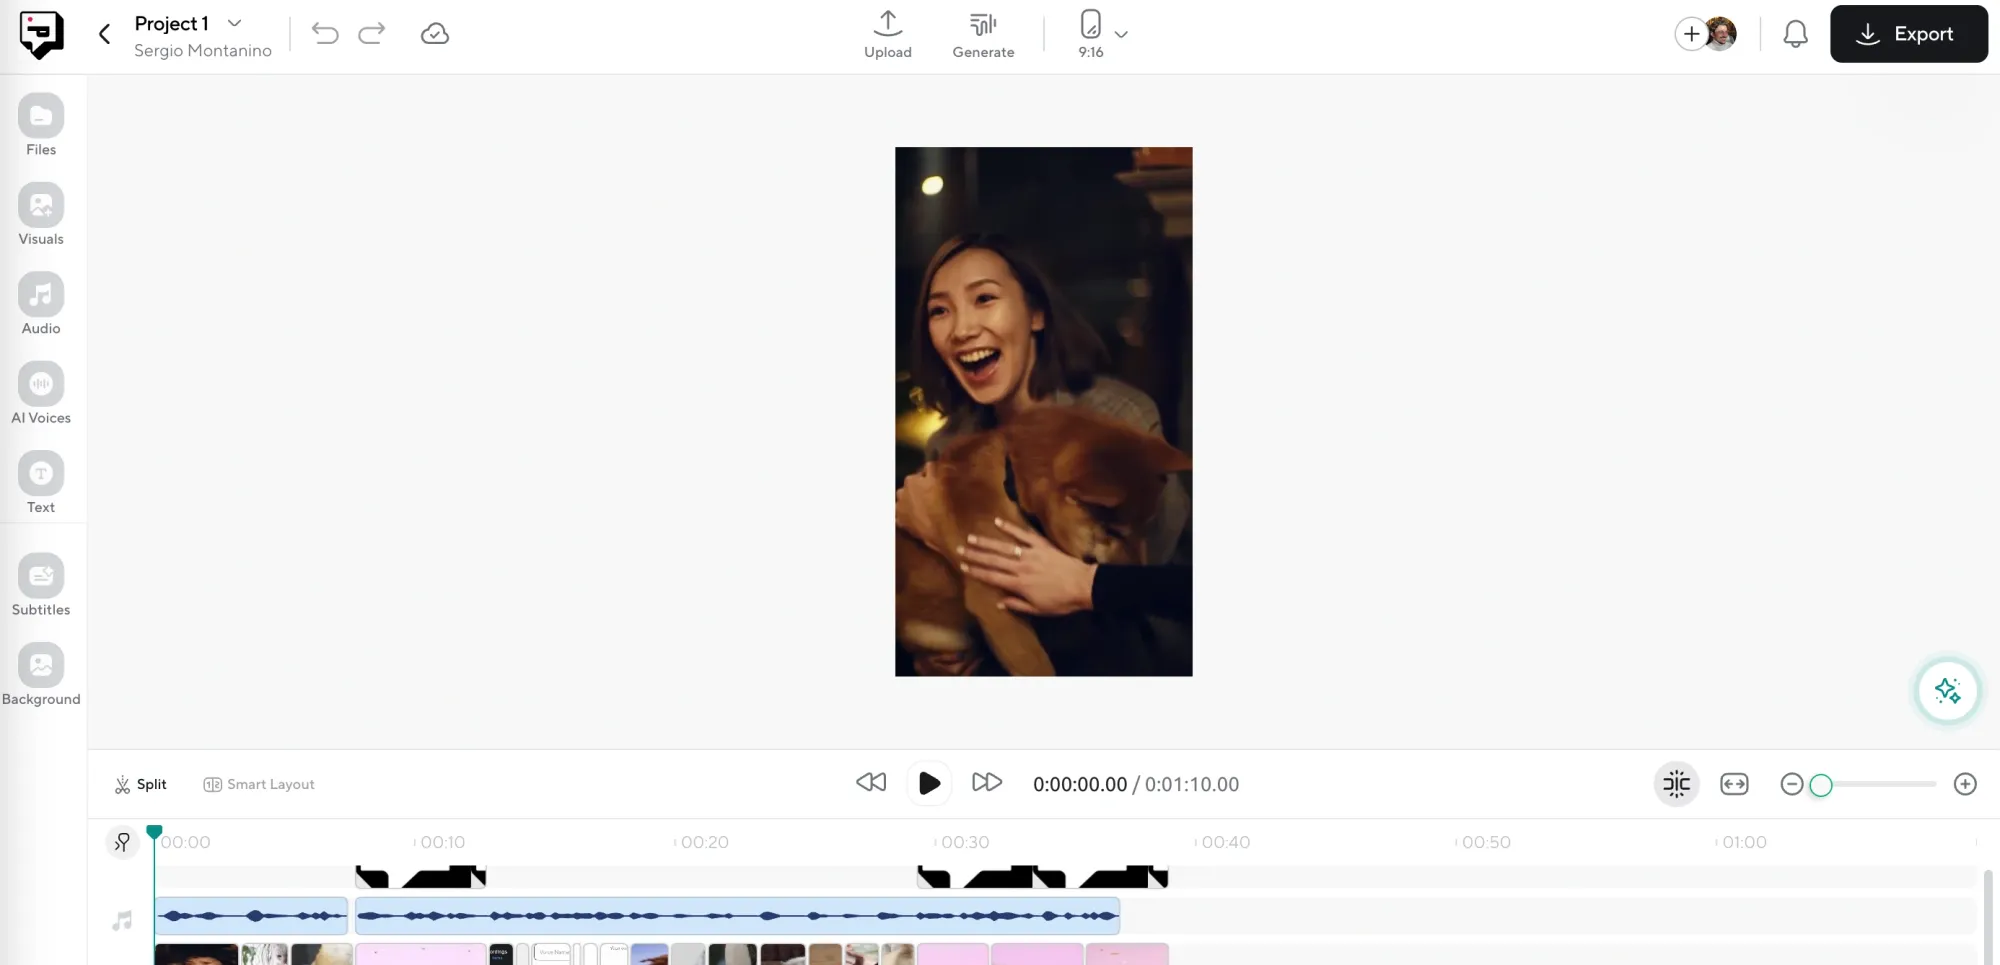
First things first, head to Podcastle’s Video Editor. Click on Create New Project, then upload your TikTok footage. You can drag and drop your file, or browse through your computer to locate it.
You can upload:
- Footage you recorded directly on your phone
- Previously downloaded TikToks (just be mindful of watermarks)
- Stock footage you want to build something new from
If you're starting from scratch, you can even browse Podcastle’s built-in stock footage library to kick off your project. It’s especially handy if you need B-roll or quick filler shots to make your video more dynamic.
Step 2: Resize It for TikTok

TikTok videos look best in a 9:16 aspect ratio: that tall, full-screen format we’re all used to. Inside the editor, look for the resize tool. Select 9:16 (Vertical) and your canvas will shift to perfectly match TikTok dimensions.
If your footage was filmed horizontally, don’t panic. You can zoom in, crop, and reposition the video so that it centers correctly. And if you’re working with multiple clips, you can set each one’s frame individually to maintain that vertical consistency.
This step is crucial. Posting videos in the wrong size will either get cropped weirdly or have those black bars around it, and nobody wants that.
Step 3: Enhance the Video with AI

Here’s where the magic happens. After resizing, head to the enhancing feature. With a few clicks, Podcastle uses AI to improve the overall visual quality of your footage.
Some of the enhancements you can apply:
- Lighting correction for those clips you filmed in bad lighting
- Noise reduction if your video looks a bit grainy
- Stabilization to smooth out shaky handheld shots
You don’t need to mess with any complicated sliders. Just select the enhancement type and Podcastle does the heavy lifting for you.
Step 4: Clean Up or Add Audio
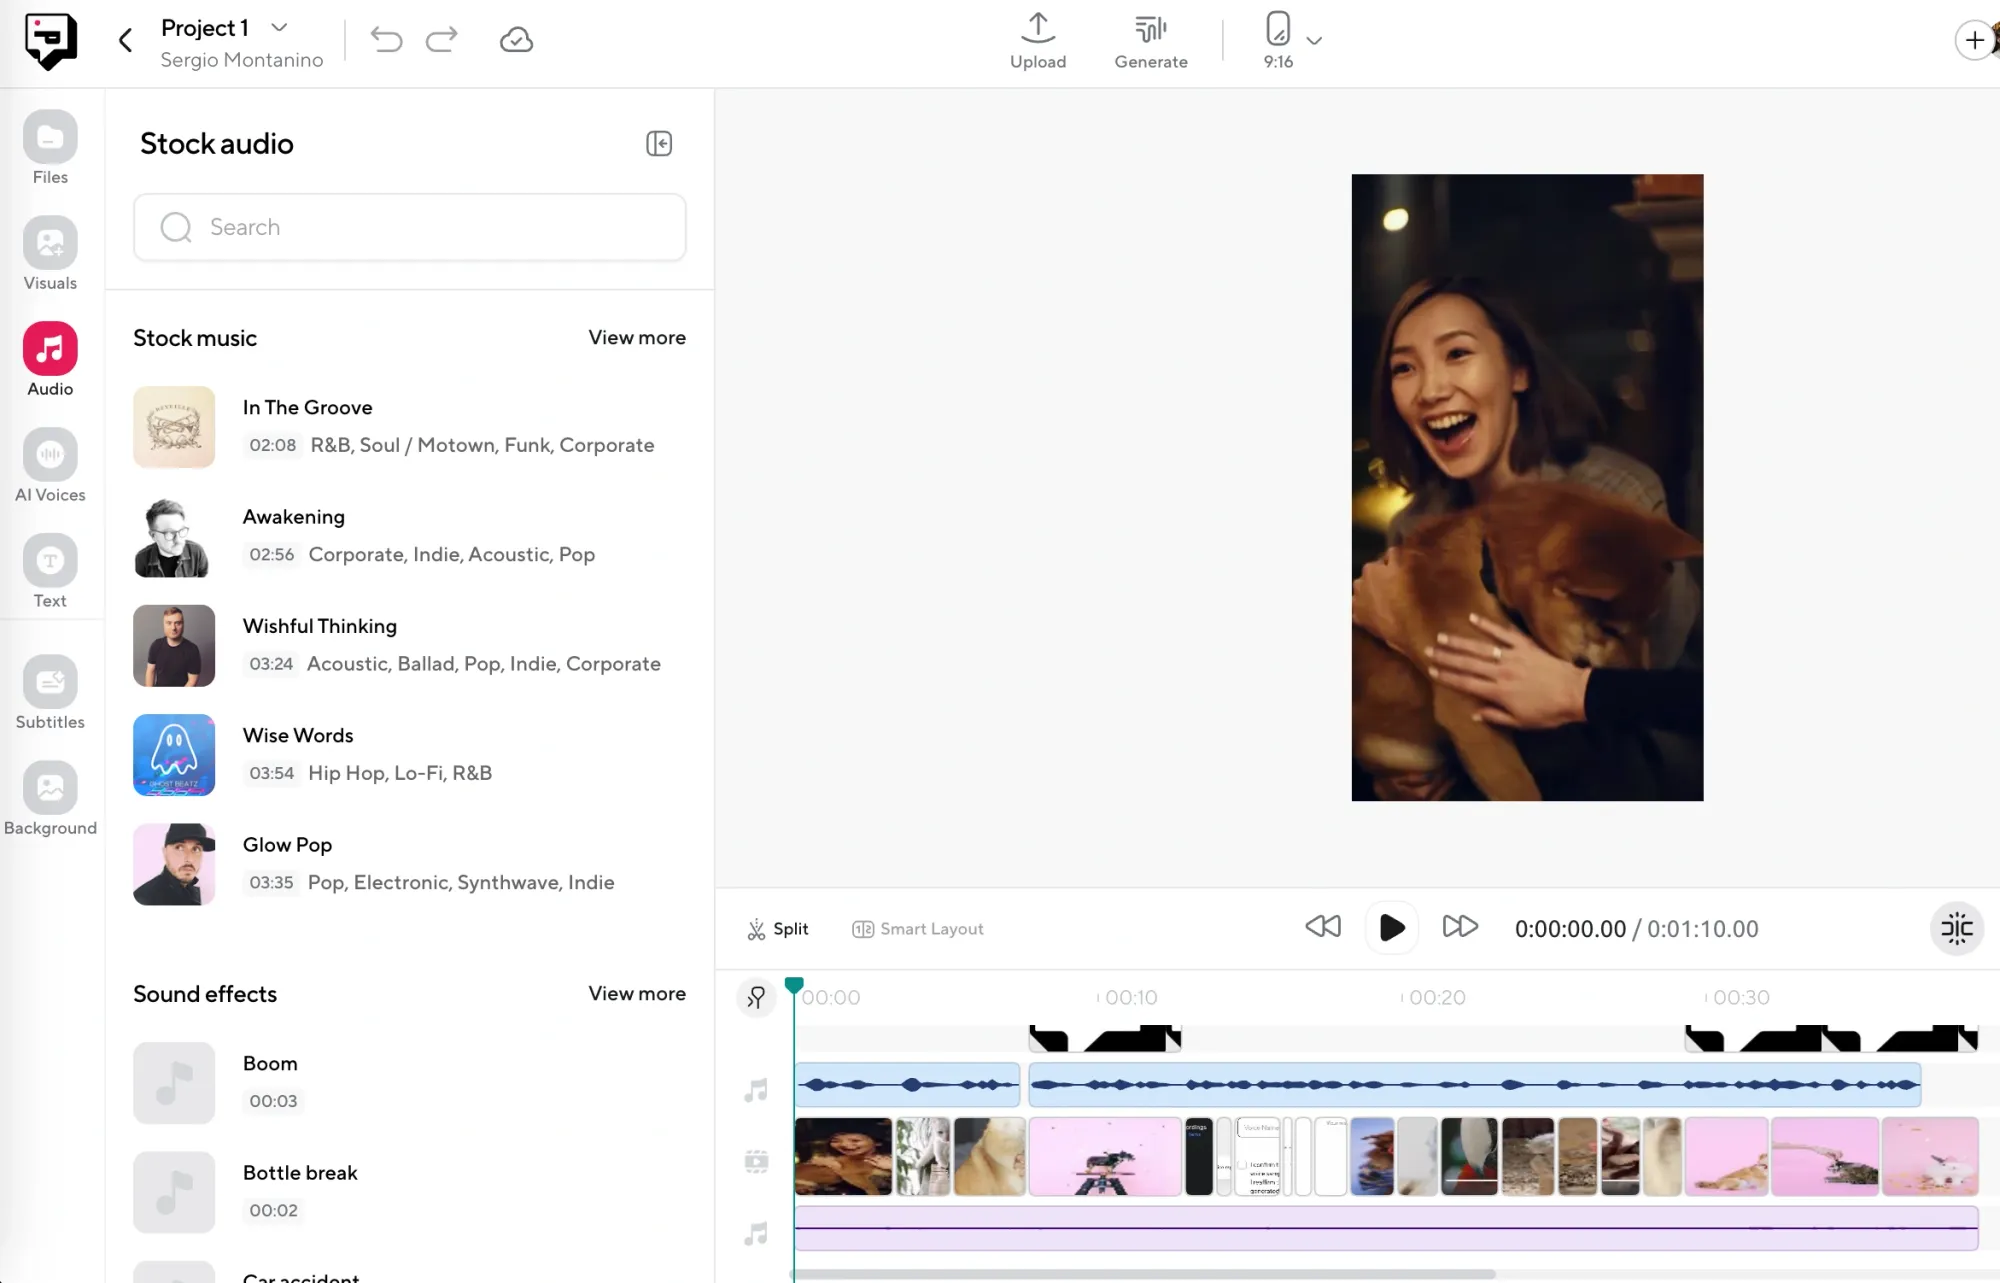
Next up: audio. Whether you’re using your own voice, a trending TikTok sound, or music from Podcastle’s library, this is the moment to polish how your video sounds.
You can:
- Trim unnecessary pauses or awkward silences
- Adjust volume to make sure your voice stands out over the background music
- Apply AI noise reduction to remove things like fan noise, static, or muffled echoes
Plus, Podcastle now includes a music and sound effect library right inside the editor. So if you need background music, transitions, or even sound design to punch up your video, it’s all there. Just drag and drop the audio into your timeline and adjust it to match your visuals.
And yes, there’s a voiceover feature too. So if you forgot to say something in your original recording, or just want to add commentary later, you can record directly in the editor or use an AI voice generator to narrate it for you. It sounds surprisingly real, and it’s a great time-saver when you're in a rush.
Step 5: Add Text, Transitions, and Visual Polish

Now let’s make it TikTok-worthy. Add captions, highlight key points, or insert animated text to keep things engaging. The editor lets you customize fonts, colors, and animation styles so your captions feel on-brand for your content.
You can also add:
- Transitions between cuts for smoother pacing
- Overlays like emojis or stickers
- Brand elements like logos or social handles
Don’t overdo it: TikTok viewers scroll fast, so the cleaner your visuals, the better. Keep the pace snappy and make sure your message comes through clearly in the first few seconds.
Step 6: Export It in the Right Format

Once you’re happy with your edits, click Export. Podcastle automatically exports your project in the ideal format for TikTok: vertical layout, MP4 format, and optimized for fast loading.
You can also choose the resolution. We recommend going with 1080p for a crisp final product that doesn’t get pixelated once uploaded.
Once it’s done exporting, transfer it to your phone and upload directly to TikTok. Or, if you’re using TikTok on desktop, you can upload it straight from your computer.
And that’s it. Your video is now clean, sharp, and ready for the For You page.
TikTok Video Editing Tips to Save You Time (and Frustration)
Let’s face it: once a TikTok is live, your editing options are limited. That’s why getting your workflow right before posting makes all the difference. Here are a few solid tips to make your next video smoother, snappier, and way less stressful.
1. Always Preview Before You Post
It’s tempting to hit “Post” as soon as the edit feels done, but previewing your video one more time can catch weird cuts, typos in captions, or mismatched audio. Think of it like proofreading, but for your content.
2. Keep It Short, but Strong
TikTok’s sweet spot is fast-paced, high-impact content. Trim the fluff and lead with your hook. The first three seconds make or break engagement.
3. Use Captions. Always
Adding text helps viewers follow along without sound and makes your video more accessible. Most TikTok video editors (including Podcastle) let you customize font, size, and animation. Use that to your advantage.
4. Create a Template for Future Posts
Save time by reusing an editing layout. Whether it’s your logo placement, intro format, or font combo, templates streamline your process and keep your content consistent.
5. Use the Right Tools
If you’re tired of editing inside the app, the best editing software for TikTok gives you more control and better quality. A dedicated TikTok video editor like Podcastle lets you enhance footage, add music, and export in perfect format, without starting over every time.
Editing TikTok videos doesn’t have to be chaotic. With the right habits and a little planning, you’ll never have to Google “how to edit a TikTok video after posting” in a panic again.
Final Thoughts
Editing a TikTok video after it’s already been posted can feel a little like trying to fix a painting after it’s been hung in a gallery. Your options are limited, and there’s no easy undo button. But that’s exactly why it pays to slow down before you hit publish. A few extra minutes spent editing your video properly, checking your captions, and making sure your audio and visuals are on point can save you from the stress of needing to pull everything down and start over.
The good news is that tools like Podcastle make this process a lot easier. You’re not stuck editing everything inside the TikTok app, which, while convenient, isn’t always built for fine-tuning. If you care about making your videos clean, smooth, and worth rewatching, then using a proper video editor is one of the best things you can do. It gives you more room to experiment, more control over the final look, and fewer regrets once your content goes live.
So yes, you can’t fully edit a video that’s already been posted, but you can build a better process that makes every video feel more intentional from the start. That’s the part that actually makes a difference, and it’s what helps your content stand out.
FAQs
How to remove a video from TikTok
To remove a video from your TikTok profile, go to the video, tap the three dots (bottom right), and select Delete. Once deleted, the video is gone for good, along with its views, comments, and likes, so make sure you really want to get rid of it.
How to archive a TikTok video
TikTok doesn’t have a traditional “archive” feature, but the closest alternative is making the video private. This removes it from public view without deleting it entirely, which leads us to…
How to make a video private on TikTok
Tap into the video you want to hide, hit the three dots, then go to Privacy Settings. From there, choose “Only Me” under Who can watch this video. This lets you keep the video on your profile without letting the world see it.